Part 2
Only continue on this page if you are looking for help with our online escape game.
Ensure you complete all steps in each section before attempting to enter a code. Skipping steps will mean you may receive a ‘This code is not valid’ message or the game may not unlock. This is because the game checks tasks have been completed prior to unlocking new areas.
Cosmo’s Key Puzzle
Clue 1
Cosmo’s hungry. Try to find any items around the Warp Core that may help you feed him.
Clue 2
Once you’ve collected the food packets from the food store in the corner, you’ll be able to drag three to Cosmo’s bowl. There should be a clue lying around the Warp Core that will help you work out which three food he likes.
Clue 3
Take a closer look at the note on Cosmo’s kennel to find out which three foods Cosmo likes to eat and in which order.
Answer
You need to feed Cosmo food pouches 5, 3 and 6 in that order to distract him from the key.
Escaping the Cell
Clue 1
If you look through the bars you can see a skeleton with a ring of keys. Try to find something in your cell you could throw to knock the keys to the floor.
Clue 2
After throwing all 4 rocks at the skeleton, the keys will fall into the box on the floor, you should be able to pull the box to you to retrieve the keys. One of these keys will open the box on the wall.
Clue 3
Once you have unlocked box and retrieved the knife, you can use it to cut through the 4 ropes on the door. Position the knife tip where the rope crosses the gap in the door.
Candles
Clue 1
Look closer at the fireplace in the corner of the room to find a matchstick. You can light this matchstick on the candelabra hanging on the wall.
Clue 2
Once you have a lit match, you can use it to light the four candles by the window. Once they are burning, they may take a while to burn down so try to do something else while you wait.
Clue 3
Once all candles have burnt down, they should reveal a directional code on the wall. Use this code in the padlock on the locked drawer.
Answer
Press the Up arrow 3 times
Press the Down arrow 2 times
Press the Up arrow 1 time
Press the Down arrow 2 times
If you make a mistake, the reset button will reset the padlock.
Word Wall
Clue 1
Search through the head basket in the corner of the room by dragging the bags out of the way. At the bottom of the basket is a key. Use this key to unlock the locked cabinet and collect several word blocks.
Clue 2
Once you’ve collected the word blocks you can slot them into the word wall next to the head basket. Try to make work from Sword to Keeps by only changing one letter each step down the wall.
Clue 3
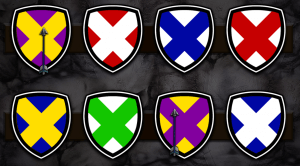
Once correct – the wall will show four of the words pointing to a different shield shape. This information will be useful later.
Answer
SWORD
WORST
WROTE
STORE
PORTS
STRAP
PASTE
STEEP
KEEPS
Skull Tower (and Merlin’s Diary)
Clue 1
One of the 8 hotspots on the tower will show a hand indicating that there is something inside that you can move. Drag it to the hole to move it up the tower.
Clue 2
Once moved, you will need to find the new location of the skull, indicated by the hand hotspot. From here on you will have two options – one hole will move the skull up the tower and one will move the skull down the tower. Look closely to work out which hole is which.
Clue 3
Pay attention to the colour of the holes to work out which one will move the skull up and which will move it down. Once the skull is at the top of the tower, click on it to reveal the code to unlock Merlin’s Diary.
Answer

Potion Cabinet
Clue 1
Once you have unlocked Merlin’s Diary – take a closer look at the name Merlin for the code to unlock the Potion Cabinet.
Clue 2
The code to the cabinet is 321 – once unlocked you will be able to make a potion by combining any 3 ingredients. Hover over each bottle and it will transform into an image that will indicate what the ingredient inside is.
Clue 3
The notes in Merlin’s diary may help you find the correct ingredients for some important potions. If you make a correct potion, the liquid will be clear and will give you a vision. If you make an incorrect potion, the liquid will be black. You’ll need to drink the potion either way so be careful!
Answer
‘Worst’ Potion
Frog Croaks (Light Blue)
Sunflower Pollen (Yellow)
Unicorn Horn (Pink)
‘Wrote’ Potion
Fish Tails (Purple)
Maelstrom Moisture (Dark Blue)
Erie Eyeballs (Orange)
‘Strap’ Potion
Spider’s Legs (Red)
Unicorn Horn (Pink)
Erie Eyeballs (Orange)
‘Paste’ Potion
Sunflower Pollen (Yellow)
Erie Eyeballs (Orange)
Leafy Leaves (Green)
Bow and Arrow Locations
Answer
Locked Drawer (Candles) – 3 arrows
Locked Cabinet (Word Wall) – 1 arrow
Room 1 – 2 arrows
Room 2 – 2 arrows & Bow
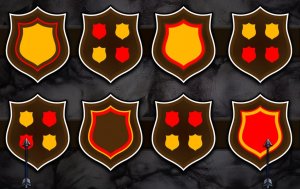
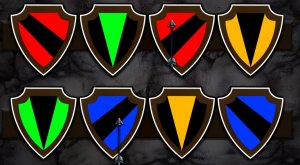
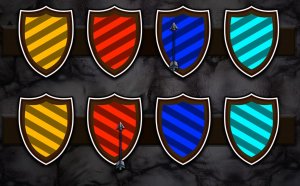
Shooting the Shields
Clue 1
If you have collected all 8 arrows and the bow, you will be able to shoot arrows when you inspect the 4 sets of shields. Each set allows you to shoot two shields. You will need to have solved the word wall AND the potion cabinet for the information you need for this puzzle.
Clue 2
By drinking the correct potions, you will have a vision of two shields being shot with a word written on the wall. Find the shield shape linked to the word using your completed Word Wall and then shoot the indicated shields from your vision. Repeat this process for each set of shields.
Answer