Part 1
Only continue on this page if you are looking for help with our online escape game.
Ensure you complete all steps in each section before attempting to enter a code. Skipping steps will mean you may receive a ‘This code is not valid’ message or the game may not unlock. This is because the game checks tasks have been completed prior to unlocking new areas.
Air Valve Puzzle
Clue 1
Try to find any items around the Warp Core that may help you fix the air pressure system.
Clue 2
Once you’ve collected the pipe from the floor next to the hatch, plug it in by the blue beacon next to the help screen and press the blue button to start the air flow.
Clue 3
Use the clipboard on the desk to work out what level each gauge should be at. Once correct, you will gain access to the lockers.
Answer
Vault: 4
Core: 2
Command: 0
Tech: 3
Power Plug Puzzle
Clue 1
The lights above the 4 circles change each time a different switch is pulled. They may help you work out the code for the padlocked case.
Clue 2
Try turning off the lights to see if any clues present themselves.
Clue 3
Once collected, place the 3 plugs into the row of 6 sockets in the order that is revealed when you turn off the lights.
Answer
C: Plug Socket Alpha
A: Plug Socket Delta
B: Plug Socket Foxtrot
Round Colour Maze Puzzle (Unlock Roller Shutter)
Clue 1
Once you have collected all 12 pieces from locker 2 you will need to place them into the sections of the circles so that a complete path is possible from the arrow in the top left to the arrow in the bottom right.
Clue 2
Some puzzle pieces look as though they may fit in more than one place but only one combination will create a complete path from start to finish, passing through 5 colours in total.
Clue 3
The correct path passes through two colours in the first circle and then one colour in each of the other circles. Once you have your 5 colours, enter the code into the roller shutter unlock screen.
Answer
Pink, Blue, Yellow, Orange, White
Tins and CCTV Screen (Unlocks Shape Safe)
Clue 1
Once you have collected all 6 tins from the shelves in the first room, you will be able to drag them into the bucket. Once in place, the scales above the bucket will reveal the weight of the tin.
Clue 2
Work out the weights of the four foods indicated on the cctv system panel to unlock the cctv emergency recording.
Clue 3
Use the sign on the noticeboard to convert the correct order of shapes from the emergency CCTV recording. This will unlock the shape safe.
Answer - Tins
Tin Weights:
Soup: 1
Chicken: 4
Pizza: 3
Corn: 2
Answer - Shape Safe
Shapes:
Hexagon
Rectangle
Square
Star
Circle
Triangle
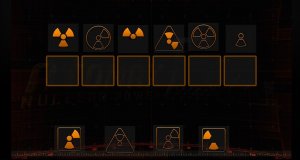
Unlock Tablet
Clue 1
Spin the three metal pipes in room 3 to discover 6 different symbols
Clue 2
You will need to read these symbols in order from top to bottom, following the orange pathway, to unlock the tablet.
Clue 3
Drag the symbols on the tablet into the entry bar so that they match the order on the pipes.
Answer
Radiation Equipment (unlocks Number Safe)
Clue 1
Once you have collected the radiation equipment from the R&D hatch in the Warp Core you are able to enter the portal again using the equipment to find 6 radiation hotpots.
Clue 2
Once you have scanned each hot-spot, their readout information will appear on the readout screen in room 3 (you will not be able to view this while wearing your radiation equipment. You will need to leave and re-enter the portal to remove this equipment).
Clue 3
The 6 readouts will grant you access to the number safe in room 2.
Answer
190288
Facility Map Radiation
Clue 1
Once you have unlocked the tablet you will have several entries that tell you how much radiation in total is found from a number of locations.
Clue 2
On the journey mentioned in data entry 1, only one location (Entrance Foyer) has an unknown amount of radiation. Work out how much radiation you get from the other two locations and take it away from the total radiation mentioned on the data entry.
Clue 3
From here, you should now be able to repeat the process for the other data entries to complete the map.
Answer
Entrance Foyer: 10%
Central Meeting Hub: 50%
Dining Area: 20%
Medilab: 70%
Beacon Lights
Clue 1
View the readout display in room 3 to see which coloured lights need to be displayed on the beacon lights.
Clue 2
Using the two sets of white buttons (one set found in room 1, one set found in room 3) try to change the beacon lights (found in room 2) so that they match the lights shown on the display.
Clue 3
You will need to press 5 buttons in total to have the correct lights displayed. 2 buttons on control panel 1 and 3 buttons on control panel 2.
Answer
On Atmos Control Panel 1: Buttons #2 and #4 need to be pressed
On Atmos Control Panel 2: Buttons #1, #2 and #3 need to be pressed
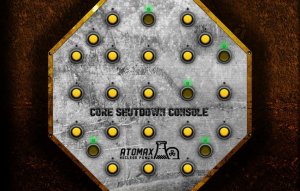
Final Puzzle
Clue 1
Once all key cards have been put in place, the big red button on the desk will become active. Press it to alter the pattern on the flashing light display.
Clue 2
Press the buttons in the first room that match the pattern on the new flashing light display.
Clue 3
Grab the plutonium rod and return to the Warp Core. Place the plutonium rod in the Artefact Hatch to complete the game.
Answer